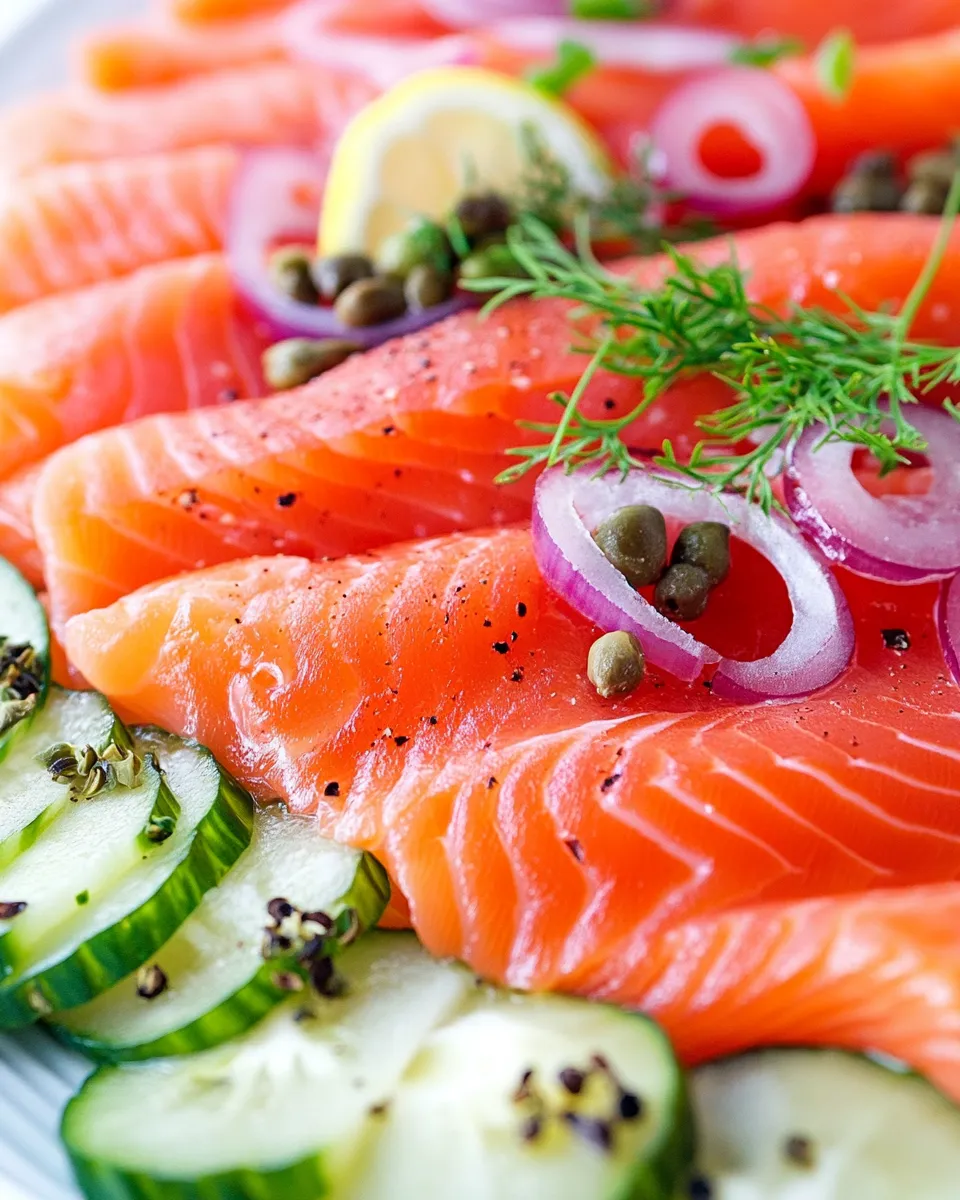
If you’ve ever indulged in a beautifully arranged bagel platter topped with rich, silky lox, you understand the allure of this delicacy. Lox, a traditional Jewish dish, is simply salmon that has been cured with a blend of salt and sugar, resulting in a luxurious flavor that’s perfect for brunch or any special occasion. While you can find lox at many delis and fish markets, making your own Homemade Lox Recipe is a rewarding experience that not only allows you to control the ingredients but also brings a sense of accomplishment. With just a few simple ingredients and a bit of patience, you can transform a 4-pound salmon fillet into a gourmet treat.
Why It Deserves a Spot

Homemade lox deserves a place in your culinary repertoire for several reasons. First, it’s incredibly versatile. You can enjoy it on a classic bagel with cream cheese, layer it in a salad, or serve it as part of a charcuterie board. Second, the flavor and freshness of homemade lox far surpass anything you can buy pre-packaged. You can customize the seasoning to match your palate, making it as spicy or herby as you desire. Lastly, the satisfaction of creating something from scratch is unparalleled. Each slice of lox becomes a testament to your skill in the kitchen.
What We’re Using

To make your own homemade lox, you’ll need the following ingredients:
- 4 pounds thick belly cut salmon fillet
- 1 cup granulated sugar
- 1 cup kosher salt or sea salt
- 2 tablespoons coarsely ground multi-color peppercorns
- 1 teaspoon liquid smoke
- 2 cups fresh dill, finely chopped
- 1/2 teaspoon chili pepper flakes
Each of these ingredients plays a significant role in achieving that delectable taste and texture that makes lox so special.
Cook’s Kit
Before you dive into making your Homemade Lox Recipe, ensure you have the following tools on hand:
- Sharp Knife: A good filleting knife will help you slice the salmon thinly and evenly.
- Plastic Wrap: You’ll need this for wrapping the salmon tightly during the curing process.
- Shallow Dish: A glass or ceramic dish is perfect for placing the salmon as it cures.
- Refrigerator: A dedicated space to let the salmon cure undisturbed for several days.
Having these essential tools ready will streamline your cooking process and ensure a successful outcome.
How to Prepare Homemade Lox Recipe
Creating your own lox is a straightforward process, but it does require some time for curing. Follow these steps to achieve the perfect Homemade Lox Recipe:
Step 1: Prepare the Salmon
Start with your 4-pound thick belly cut salmon fillet. Ensure that it is skin-on and well-trimmed. Rinse the salmon under cold water and pat it dry with paper towels. This step is crucial to remove any excess moisture.
Step 2: Make the Curing Mixture
In a medium bowl, combine the granulated sugar, kosher salt or sea salt, coarsely ground multi-color peppercorns, liquid smoke, finely chopped fresh dill, and chili pepper flakes. Mix everything well until the ingredients are evenly distributed.
Step 3: Cure the Salmon
Lay a large piece of plastic wrap on your countertop and spread half of the curing mixture on the bottom. Place the salmon fillet skin side down on top of the mixture. Next, cover the salmon with the remaining curing mixture, pressing it gently to ensure it adheres to the fish.
Step 4: Wrap and Weigh Down
Wrap the salmon tightly in the plastic wrap, ensuring no air pockets remain. Place the wrapped salmon in a shallow dish and weigh it down with another dish or a few cans. This process helps the salmon cure evenly.
Step 5: Refrigerate
Place the dish in the refrigerator and let the salmon cure for 3 to 5 days. The longer you leave it, the firmer and saltier it will become. Check it daily and pour off any liquid that accumulates.
Step 6: Rinse and Slice
Once the curing process is complete, remove the salmon from the refrigerator. Unwrap it and rinse off the curing mixture under cold water. Pat it dry with paper towels. Using a sharp knife, slice the salmon thinly at an angle for the best presentation.
Step 7: Serve and Enjoy
Your homemade lox is now ready to be enjoyed! Serve it on bagels with cream cheese, capers, and red onion, or incorporate it into your favorite dishes. The possibilities are endless!
Healthier Substitutions
If you’re looking to tweak the Homemade Lox Recipe for a healthier version, consider the following substitutions:
- Reduce Sugar: You can cut the amount of granulated sugar in half or use a natural sweetener like honey or agave syrup.
- Low-Sodium Options: Use a low-sodium kosher salt to decrease the overall sodium content.
- Fresh Herbs: Experiment with other fresh herbs like parsley or cilantro for a different flavor profile.
- Spices: Instead of chili pepper flakes, try smoked paprika for a unique twist.
These substitutions can help you enjoy lox while aligning with your dietary preferences.
Problems & Prevention
While making Homemade Lox Recipe is generally straightforward, here are a few common issues you might encounter and how to prevent them:
- Too Salty: If your lox turns out too salty, try rinsing it more thoroughly before slicing. You can also reduce the salt in your curing mixture for future batches.
- Uneven Curing: Ensure that the salmon is fully covered with the curing mixture and weighed down evenly. This will promote uniform curing.
- Texture Issues: If the salmon is mushy, it may have cured for too short a time. Conversely, if it’s too firm, it may have cured too long. Adjust the curing time according to your taste.
By being aware of these potential pitfalls, you can create a successful batch of lox every time.
Storing, Freezing & Reheating
To ensure your Homemade Lox Recipe stays fresh and delicious, follow these storage tips:
- Refrigerating: Store your sliced lox in an airtight container in the refrigerator. It should be consumed within one week for optimal freshness.
- Freezing: If you want to extend the shelf life, you can freeze the lox. Wrap it tightly in plastic wrap and place it in a freezer-safe bag. It can last up to three months in the freezer.
- Thawing: To thaw, place the frozen lox in the refrigerator overnight or run it under cold water for a quicker method. Avoid microwaving as it can alter the texture.
Proper storage will help you maintain the quality of your homemade lox.
FAQ
Can I use frozen salmon for this recipe?
Yes, you can use frozen salmon as long as it has been thawed properly. Ensure it is of high quality and safe for raw consumption.
How do I know when the lox is ready?
Your lox is ready when it feels firm to the touch and has a slightly translucent appearance. The curing process typically takes 3 to 5 days, depending on your taste preference.
Can I add other flavors to the curing mix?
Absolutely! Feel free to experiment with different herbs, spices, or citrus zest to personalize the flavor of your lox.
What’s the best way to serve homemade lox?
Homemade lox is delicious on bagels with cream cheese, capers, and red onions. It can also be served on crackers, in salads, or as part of a charcuterie board.
Looking for more culinary adventures? Check out these exciting weekend projects:
Explore these links for inspiration and more delicious recipes to try in your kitchen.
Ready to Cook?
Now that you have the knowledge and steps to create your own Homemade Lox Recipe, it’s time to roll up your sleeves and get started. This homemade version will elevate your culinary skills and impress your friends and family. Enjoy the process, and most importantly, savor the delectable results of your hard work. You’ll find that once you’ve tasted your homemade lox, you’ll never want to go back to store-bought again. Happy cooking!

Homemade Lox Recipe
Ingredients
Ingredients:
- 4 pounds thick belly cut salmon fillet skin-on and well-trimmed
- 1 cup granulated sugar
- 1 cup kosher salt or sea salt
- 2 tablespoons coarsely ground multi-color peppercorns
- 1 teaspoon liquid smoke
- 2 cups fresh dill finely chopped
- 1/2 teaspoon chili pepper flakes
Instructions
Instructions:
- Step 1: Prepare the Salmon - Rinse the salmon under cold water and pat it dry with paper towels.
- Step 2: Make the Curing Mixture - Combine granulated sugar, kosher salt, peppercorns, liquid smoke, dill, and chili pepper flakes in a medium bowl.
- Step 3: Cure the Salmon - Spread half of the curing mixture on plastic wrap, place the salmon skin side down, top with remaining mixture, and press gently.
- Step 4: Wrap and Weigh Down - Wrap the salmon tightly in plastic wrap, place it in a shallow dish, and weigh it down.
- Step 5: Refrigerate - Cure the salmon in the refrigerator for 3 to 5 days, pouring off any liquid that accumulates.
- Step 6: Rinse and Slice - Rinse the salmon under cold water, pat dry, and slice thinly at an angle.
- Step 7: Serve and Enjoy - Serve on bagels with cream cheese, or incorporate into your favorite dishes.
Equipment
- Sharp knife
- Plastic Wrap
- Shallow Dish
- Refrigerator
Notes
- Store sliced lox in an airtight container in the refrigerator for up to one week.
- Freeze wrapped lox for up to three months for longer storage.
- Experiment with different herbs and spices in the curing mixture for unique flavors.