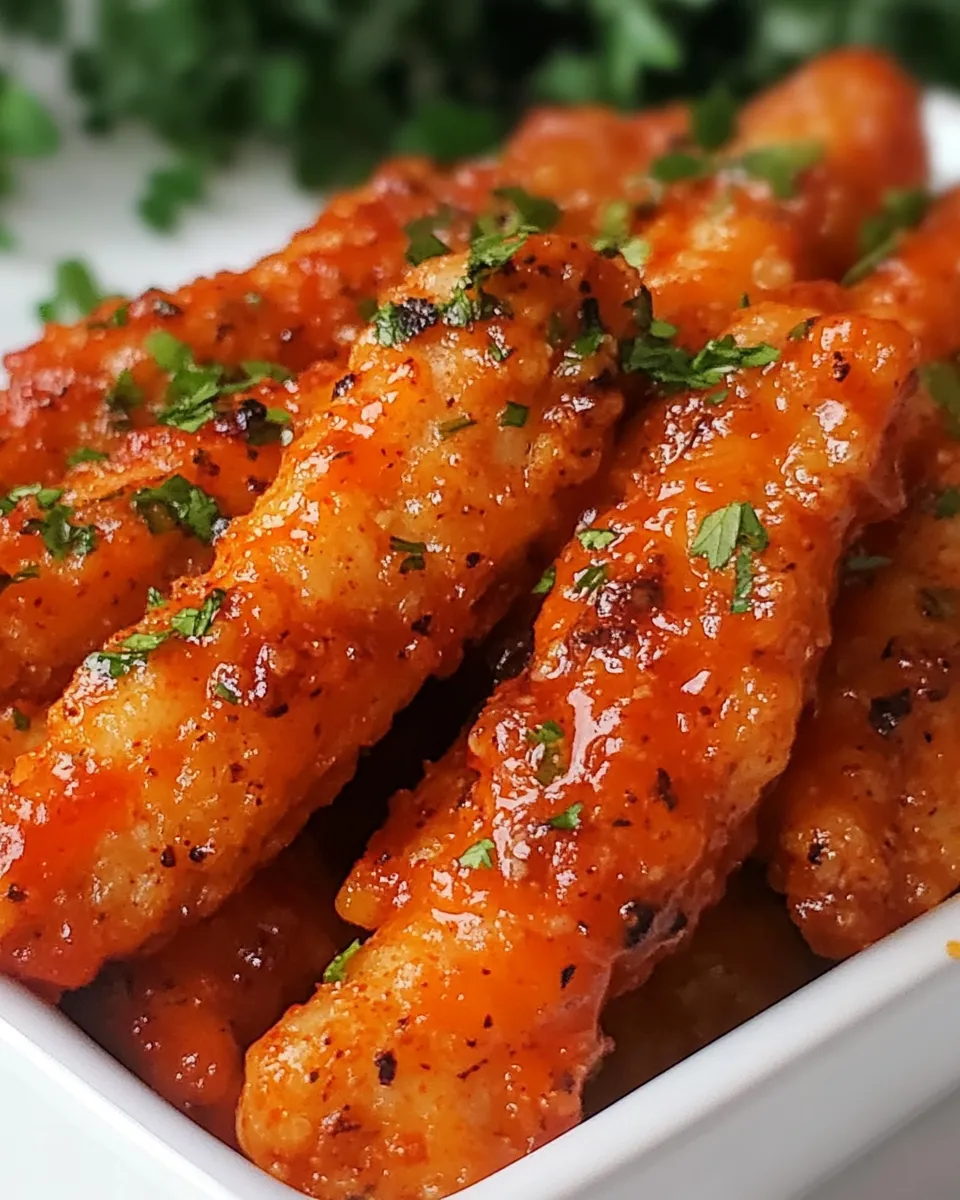
If you’re looking for a deliciously spicy twist on a classic favorite, these Spicy Sriracha Chicken Fingers are a must-try! Perfectly crunchy on the outside and juicy on the inside, this recipe brings the heat with a delightful glaze of Sriracha sauce that packs a flavorful punch. Whether you’re making them for a family dinner, a game day snack, or a cozy night in, these chicken fingers are sure to impress.
Why You’ll Keep Making It

These Spicy Sriracha Chicken Fingers are not only simple to whip up but also incredibly versatile. They can be served as an appetizer, a main dish, or even tossed into a salad for a spicy kick. The combination of the seasoned coating mix and the spicy sauce creates a delectable flavor profile that keeps you coming back for more. Plus, they’re gluten-free, making them suitable for a wide variety of dietary needs!
Gather These Ingredients

To make your own batch of Spicy Sriracha Chicken Fingers, you’ll need the following ingredients:
- 2 cups gluten-free seasoned coating mix (I recommend Hodgson Mill’s brand for its fantastic flavor)
- 2 teaspoons garlic powder
- 2 teaspoons salt
- 3/4 teaspoon black pepper
- 1 teaspoon cayenne pepper
- 1 teaspoon paprika
- 3/4 cup milk
- 1 large egg
- 4 boneless, skinless chicken breasts, cut into 1/2″ strips
- 1/3 cup Sriracha hot sauce
- 2 teaspoons Tabasco sauce
- 1 teaspoon honey
- 1 1/2 tablespoons butter, melted
- 1 tablespoon fresh parsley, chopped
- Olive oil (or other variety) for frying
Must-Have Equipment
Before you start cooking, gather the following equipment:
- Large mixing bowl – for combining your ingredients.
- Whisk – to mix the egg and milk smoothly.
- Frying pan or deep skillet – for frying your chicken fingers to crispy perfection.
- Meat thermometer – to ensure your chicken is cooked through.
- Paper towels – for draining excess oil after frying.
Spicy Sriracha Chicken Fingers: From Prep to Plate
Let’s dive into the step-by-step process of making these mouthwatering Spicy Sriracha Chicken Fingers!
Step 1: Prepare Your Chicken
Start by cutting your boneless, skinless chicken breasts into 1/2″ strips. This size ensures they cook evenly and get that delightful crunch.
Step 2: Make the Coating Mixture
In a large mixing bowl, combine the gluten-free seasoned coating mix, garlic powder, salt, black pepper, cayenne pepper, and paprika. Mix these dry ingredients thoroughly to ensure the spices are evenly distributed.
Step 3: Prepare the Wet Mix
In another bowl, whisk together the milk and the egg until well combined. This wet mixture will help the coating stick to the chicken.
Step 4: Coat the Chicken
Dip each chicken strip first into the wet mixture, allowing any excess to drip off, and then coat it in the seasoned dry mix. Make sure each piece is well-covered for that perfect crunch.
Step 5: Heat the Oil
In a frying pan or deep skillet, heat about 1/2 inch of olive oil over medium-high heat. You want the oil hot enough that a drop of water sizzles when it hits the surface.
Step 6: Fry the Chicken
Carefully place the coated chicken strips into the hot oil, working in batches if necessary to avoid overcrowding. Fry them for about 3-4 minutes on each side or until golden brown and cooked through. Use a meat thermometer to check that the internal temperature reaches 165°F.
Step 7: Make the Sriracha Sauce
While the chicken is frying, combine Sriracha, Tabasco sauce, honey, and melted butter in a small bowl. Mix well until smooth and glossy.
Step 8: Toss in the Sauce
Once the chicken fingers are done, remove them from the oil and drain them on paper towels. While they’re still hot, toss them in the Sriracha sauce mixture until well coated.
Step 9: Garnish and Serve
Finally, sprinkle the chicken fingers with chopped fresh parsley for a pop of color and freshness. Serve them hot with your favorite dipping sauce or enjoy them as is!
Low-Carb/Keto Alternatives
If you’re following a low-carb or keto diet, here are some alternatives to consider:
- Use almond flour or coconut flour instead of the gluten-free seasoned coating mix for a lower-carb option.
- Replace honey with a low-carb sweetener like erythritol or stevia.
- Pair with a low-carb dipping sauce such as ranch or a creamy avocado dip.
Troubleshooting Tips
If you encounter any issues while making your Spicy Sriracha Chicken Fingers, here are some quick tips:
- If the coating isn’t sticking, make sure the chicken is well-coated in the egg and milk mixture before dredging in the dry mix.
- If the chicken is browning too quickly, lower the heat to ensure it cooks through without burning.
- For extra crispiness, allow the coated chicken strips to sit for a few minutes before frying.
Make-Ahead & Storage
These Spicy Sriracha Chicken Fingers can be made ahead of time for convenience:
- Prep the chicken and coat it earlier in the day, then store it in the refrigerator until you’re ready to fry.
- Cooked chicken fingers can be stored in an airtight container in the fridge for up to 3 days.
- You can also freeze the cooked chicken fingers for up to 2 months. Reheat in the oven to restore their crispiness.
Ask the Chef
Can I use chicken thighs instead of breasts?
Absolutely! Chicken thighs will add a bit more juiciness and flavor to your fingers, making them even more delicious.
What can I serve with these chicken fingers?
These chicken fingers pair wonderfully with a side of coleslaw, fries, or a fresh salad. You can also serve them with various dipping sauces like ranch or blue cheese for an extra flavor boost.
Can I bake these instead of frying?
Yes! Preheat your oven to 400°F and place the coated chicken fingers on a baking sheet lined with parchment paper. Spray with a little olive oil and bake for about 20-25 minutes or until golden brown, flipping halfway through.
How spicy are these chicken fingers?
The heat level can be adjusted based on your preference. If you prefer milder chicken fingers, reduce the amount of Sriracha and Tabasco sauce, or omit the cayenne pepper from the coating mix.
If you enjoyed these , check out more delicious recipes:
Bring It Home
Now that you have the recipe for Spicy Sriracha Chicken Fingers, it’s time to gather your ingredients and get cooking! These flavorful chicken strips are sure to become a favorite in your kitchen, whether enjoyed as a snack or as part of a meal. With their crunchy exterior and spicy glaze, they’re a delightful way to spice up your dinner routine. So gather your family, dip, crunch, and enjoy every bite!

Spicy Sriracha Chicken Fingers
Ingredients
For the Chicken Fingers:
- 2 cups gluten-free seasoned coating mix recommended Hodgson Mill's brand
- 2 teaspoons garlic powder
- 2 teaspoons salt
- 3/4 teaspoon black pepper
- 1 teaspoon cayenne pepper
- 1 teaspoon paprika
- 3/4 cup milk
- 1 large egg
- 4 pieces boneless, skinless chicken breasts cut into 1/2" strips
- 1/3 cup Sriracha hot sauce
- 2 teaspoons Tabasco sauce
- 1 teaspoon honey
- 1 1/2 tablespoons butter melted
- 1 tablespoon fresh parsley chopped
- Olive oil for frying
Instructions
Cooking Instructions:
- Step 1: Prepare Your Chicken - Start by cutting your boneless, skinless chicken breasts into 1/2" strips.
- Step 2: Make the Coating Mixture - In a large mixing bowl, combine the gluten-free seasoned coating mix, garlic powder, salt, black pepper, cayenne pepper, and paprika. Mix thoroughly.
- Step 3: Prepare the Wet Mix - In another bowl, whisk together the milk and the egg until well combined.
- Step 4: Coat the Chicken - Dip each chicken strip into the wet mixture, then coat it in the seasoned dry mix.
- Step 5: Heat the Oil - In a frying pan, heat about 1/2 inch of olive oil over medium-high heat.
- Step 6: Fry the Chicken - Carefully place the coated chicken strips into the hot oil. Fry for about 3-4 minutes on each side.
- Step 7: Make the Sriracha Sauce - Combine Sriracha, Tabasco sauce, honey, and melted butter in a bowl. Mix well.
- Step 8: Toss in the Sauce - Once the chicken is done, toss in the Sriracha sauce mixture until well coated.
- Step 9: Garnish and Serve - Sprinkle with fresh parsley and serve hot!
Equipment
- Large Mixing Bowl
- Whisk
- Frying pan or deep skillet
- Meat Thermometer
- Paper Towels
Notes
- For extra crispiness, let coated chicken strips sit for a few minutes before frying.
- If the coating isn't sticking, ensure chicken is well-coated in the egg and milk mixture.
- Cooked chicken fingers can be stored in the fridge for up to 3 days.