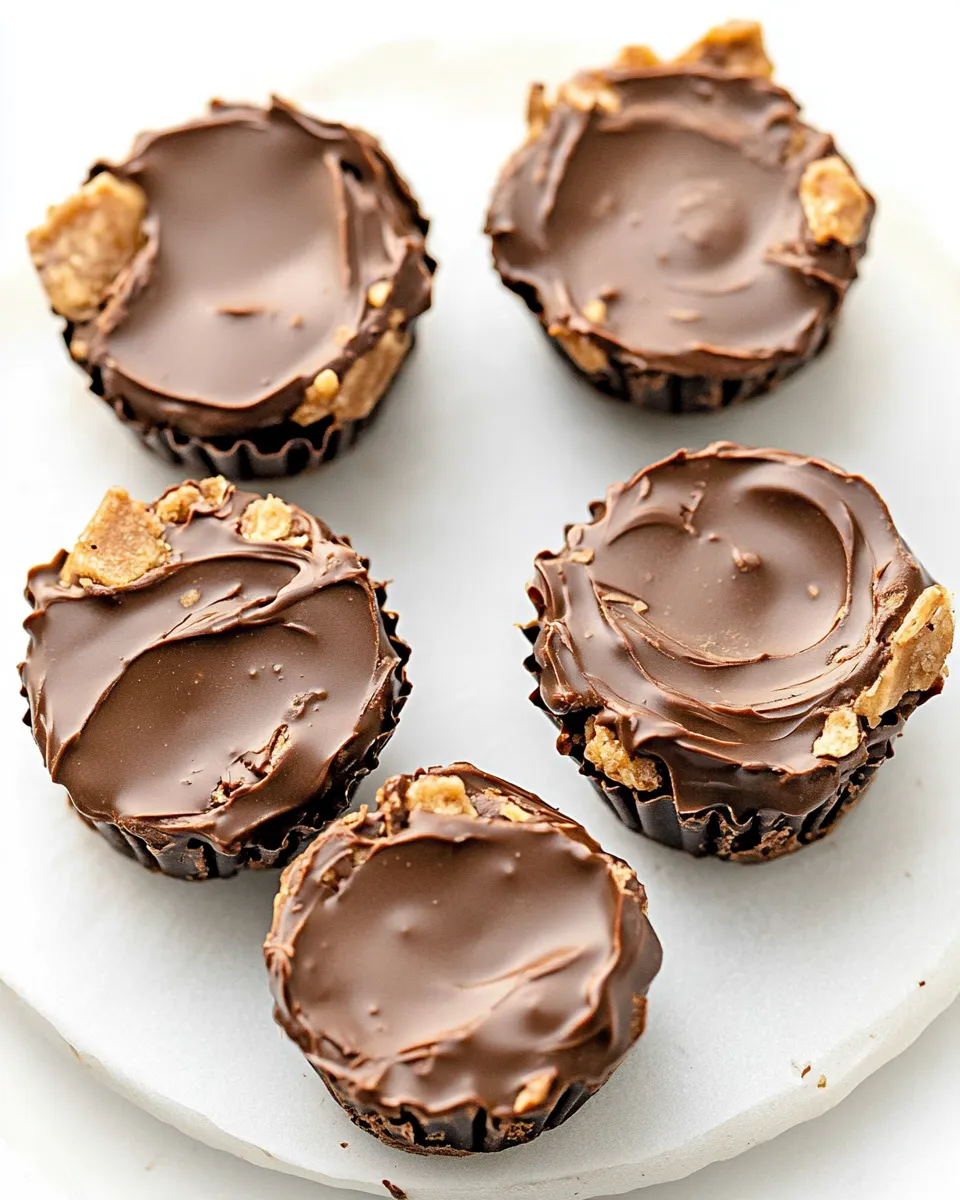
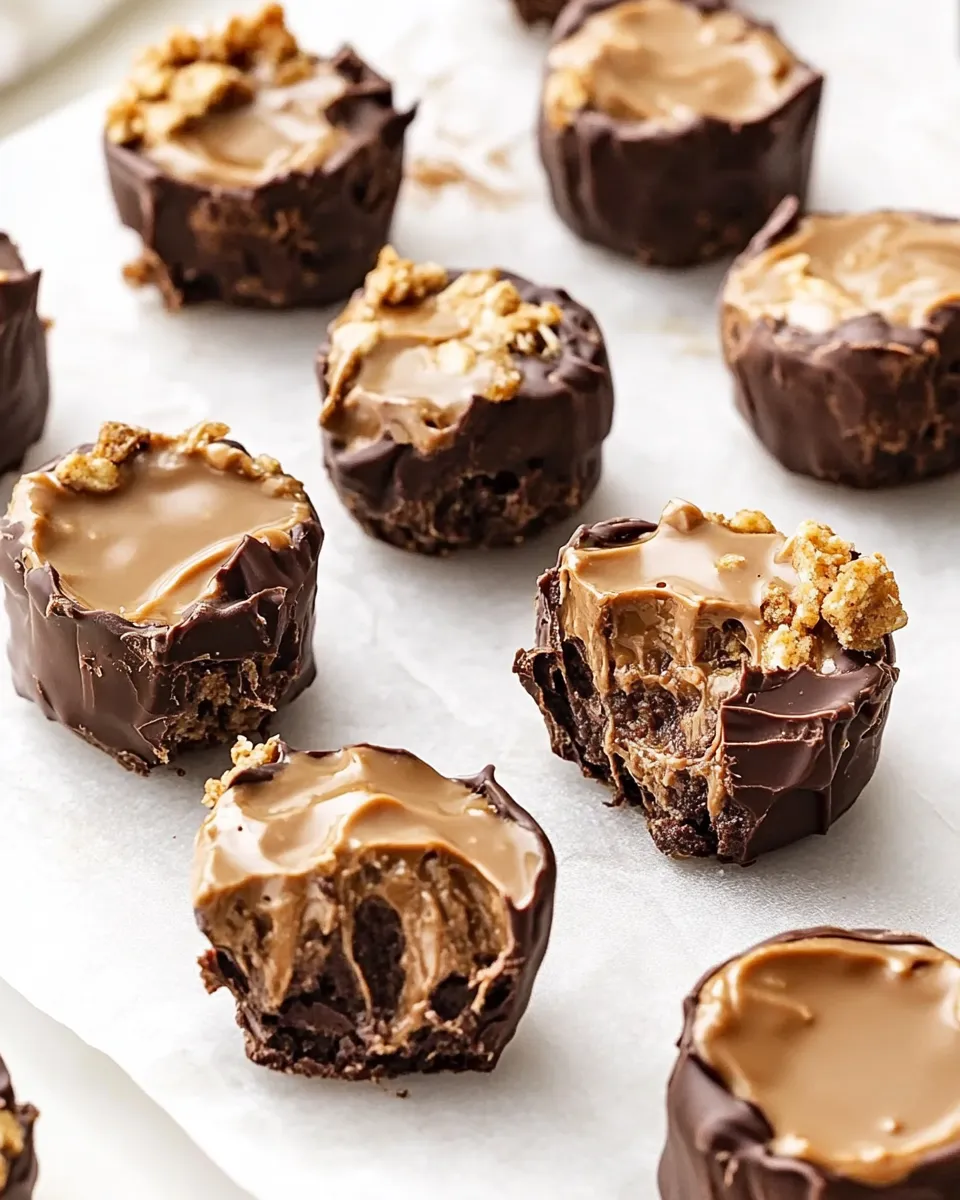
If you’re a chocolate lover who craves a quick and easy sweet treat, then you’re in the right place! These No Bake Chocolate Crunch Cups are the perfect solution for satisfying your chocolate cravings without turning on the oven. With just a handful of simple ingredients, you can whip up these delightful cups in no time at all. Imagine the rich, creamy chocolate mingling with the crunchy rice cereal, creating a delightful contrast that will have everyone reaching for seconds (and thirds!).
Whether you’re looking for a fun dessert for a gathering or a sweet snack to enjoy at home, this recipe for No Bake Chocolate Crunch Cups will surely hit the spot. Let’s dive into the reasons you’ll love these treats and how to make them!
Reasons to Love No Bake Chocolate Crunch Cups
There are countless reasons to adore these No Bake Chocolate Crunch Cups. Here are just a few:
– **Quick and Easy**: This recipe requires no baking, so you can have a delicious treat ready in under 30 minutes.
– **Customizable**: You can easily modify the recipe with your favorite add-ins, whether that’s nuts, seeds, or dried fruits.
– **Perfect for Any Occasion**: These cups make a great party treat, a sweet surprise for your kids, or a quick snack for yourself.
– **Delicious Texture**: The combination of smooth chocolate and crunchy rice cereal creates a delightful texture that will keep you coming back for more.
– **Healthy-ish**: With the option to add peanut butter or other nutritious ingredients, you can feel good about enjoying these treats.
Shopping List

To make these delectable No Bake Chocolate Crunch Cups, gather the following ingredients:
- 1 cup chocolate chips or broken-up chocolate (6 oz)
- 1/2 cup to 1 cup rice crispies cereal (depending on desired crispiness)
- Optional: 2 tsp oil (for a smoother consistency)
- Optional: peanut butter or allergy-friendly substitute
- Optional add-ins of choice (see list earlier in the post)
Before You Start: Equipment
You’ll need a few basic kitchen tools to make your No Bake Chocolate Crunch Cups:
- Microwave-safe bowl or double boiler (for melting chocolate)
- Mixing spoon (to combine ingredients)
- Silicone muffin cups or a standard muffin tin lined with paper liners
- Measuring cups and spoons (for accurate measurements)
From Start to Finish: No Bake Chocolate Crunch Cups
Making these No Bake Chocolate Crunch Cups is a breeze! Follow these simple steps:
Step 1: Melt the Chocolate
In a microwave-safe bowl, add the chocolate chips. Heat in the microwave in 30-second intervals, stirring in between, until the chocolate is completely melted and smooth. If using a double boiler, simply melt the chocolate over simmering water while stirring until smooth.
Step 2: Add Optional Ingredients
If you want to make your chocolate even more luscious, add the optional 2 teaspoons of oil and stir until fully combined. You can also mix in peanut butter or any allergy-friendly substitute at this stage for added flavor.
Step 3: Mix in Rice Crispies
Gradually fold in the rice crispies cereal. Start with 1/2 cup and add more if you desire extra crunch. Make sure the cereal is evenly coated with the melted chocolate.
Step 4: Add Extra Goodies
If you’re using any add-ins like nuts, seeds, or dried fruits, fold them into the mixture now.
Step 5: Spoon into Molds
Spoon the chocolate-cereal mixture into the silicone muffin cups or lined muffin tin, pressing down gently to pack them in.
Step 6: Chill
Place the filled molds in the refrigerator for about 30 minutes, or until the chocolate has set completely.
Step 7: Enjoy!
Once set, remove the cups from the molds and enjoy your delicious No Bake Chocolate Crunch Cups!
Quick Replacement Ideas
If you find yourself missing an ingredient or want to customize your No Bake Chocolate Crunch Cups, here are some great substitutions:
- Chocolate chips: Use any type of chocolate (dark, milk, or white) or a dairy-free alternative.
- Rice crispies: Substitute with puffed quinoa, granola, or crushed pretzels for a different crunch.
- Oil: Coconut oil, avocado oil, or nut butter can work as alternatives.
- Peanut butter: Almond butter, sunflower seed butter, or cashew butter are great allergy-friendly substitutes.
Recipe Notes & Chef’s Commentary
- For a deeper chocolate flavor, consider using dark chocolate chips.
- Make sure not to overheat the chocolate when melting, as it can become grainy.
- The amount of rice crispies can be adjusted based on how crispy you want your cups to be.
- These cups can be made ahead of time and stored in the refrigerator for a quick snack throughout the week.
Storing, Freezing & Reheating
Store your No Bake Chocolate Crunch Cups in an airtight container in the refrigerator for up to one week. For longer storage, you can freeze them. Just make sure to separate layers with parchment paper to prevent sticking. When you’re ready to enjoy, simply let them thaw in the fridge for a few hours.
Quick Q&A
Can I use chocolate bars instead of chocolate chips?
Absolutely! Broken-up chocolate bars work perfectly and can add a unique flavor to your No Bake Chocolate Crunch Cups.
How can I make these cups healthier?
Consider using dark chocolate, reducing the amount of added sugar, or incorporating nuts and seeds for added nutrition.
Can I make these vegan?
Yes! Just use dairy-free chocolate chips and a plant-based nut butter to keep the recipe vegan-friendly.
What if I don’t have rice crispies?
You can substitute with any crispy cereal, granola, or even crushed graham crackers for a different texture.
Bring It Home
Now that you have the easy recipe for No Bake Chocolate Crunch Cups, it’s time to gather your ingredients and get started! You’ll love how simple and satisfying these treats are, and the best part? You can tailor them to your taste with your favorite add-ins. Whether it’s a cozy night in or a gathering with friends, these crunchy chocolate cups are sure to impress. Enjoy the process and share your delicious creations with friends and family. Happy snacking!

No Bake Chocolate Crunch Cups
Ingredients
- 1 cup chocolate chips or broken-up chocolate (6 oz)
- 1/2 cup rice crispies cereal (depending on desired crispiness)
- 2 tsp oil (optional, for a smoother consistency)
- 1 cup peanut butter or allergy-friendly substitute (optional)
- optional add-ins of choice (see list earlier in the post)
Instructions
- In a microwave-safe bowl, add the chocolate chips. Heat in the microwave in 30-second intervals, stirring in between, until the chocolate is completely melted and smooth.
- If you want to make your chocolate even more luscious, add the optional 2 teaspoons of oil and stir until fully combined.
- Gradually fold in the rice crispies cereal. Start with 1/2 cup and add more if you desire extra crunch.
- If you’re using any add-ins like nuts, seeds, or dried fruits, fold them into the mixture now.
- Spoon the chocolate-cereal mixture into the silicone muffin cups or lined muffin tin, pressing down gently to pack them in.
- Place the filled molds in the refrigerator for about 30 minutes, or until the chocolate has set completely.
- Once set, remove the cups from the molds and enjoy your delicious No Bake Chocolate Crunch Cups!
Equipment
- Microwave-safe bowl
- Mixing spoon
- Silicone Muffin Cups
- Measuring Cups
- Measuring spoons
Notes
- For a deeper chocolate flavor, consider using dark chocolate chips.
- Make sure not to overheat the chocolate when melting, as it can become grainy.
- The amount of rice crispies can be adjusted based on how crispy you want your cups to be.
- These cups can be made ahead of time and stored in the refrigerator for a quick snack throughout the week.