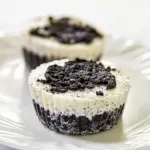
Cookies and Cream Mini Cheesecakes
These Cookies and Cream Mini Cheesecakes are incredibly delicious! A rich cheesecake with crunchy Oreo goodness in every bite.
Servings: 12 servings
Ingredients
For the Crust:
- 14 cookies Oreo for crust
- 2 tablespoons butter melted
For the Filling:
- 2 packages cream cheese softened (8 oz each)
- 1/2 cup granulated sugar
- 2 large eggs
- 1 1/3 cups white chocolate chips (about 8 oz)
- 1/3 cup heavy cream
- 1 tsp vanilla extract
For Topping:
- 14 cookies Oreo chopped
Instructions
- Step 1: Preheat the Oven - Begin by preheating your oven to 325°F (160°C).
- Step 2: Prepare the Muffin Tin - Line your 12-cup muffin tin with paper liners.
- Step 3: Make the Oreo Crust - Crush 14 Oreo cookies in a food processor. Combine with melted butter and press into the muffin liners.
- Step 4: Prepare the Cheesecake Filling - Beat cream cheese until smooth, add sugar, then eggs one at a time.
- Step 5: Melt the White Chocolate - Melt white chocolate chips and heavy cream together until smooth.
- Step 6: Combine and Flavor - Mix melted white chocolate into the cream cheese mixture with vanilla extract.
- Step 7: Fold in the Cookies - Chop remaining Oreo cookies and fold them into the cheesecake batter.
- Step 8: Fill the Muffin Tin - Spoon cheesecake mixture over the crusts, filling each cup three-quarters full.
- Step 9: Bake - Bake for about 18-20 minutes until edges are set.
- Step 10: Cool and Chill - Let cool for 10 minutes, then refrigerate for at least 4 hours.
Equipment
- 12-cup muffin tin
- Paper liners
- Mixing Bowls
- Electric Mixer
- Rubber spatula
- Measuring cups and spoons
Notes
- These mini cheesecakes can be stored in the refrigerator for up to 5 days.
- They can be frozen for up to 2 months; wrap in plastic wrap.
- Allow to cool completely before removing from liners.